This article is the ninth installment of my Flash Photography Basics Series–a crash course in using flash. To start at the beginning of the tutorial, click here.
Now that you have seen what each of the light modifiers do, you can begin working with the flashes to create lighting setups. To help you get started, I'll show you four common light setups.
At this point, you are ready to actually get shooting and learn your flash. I'll get you started here, but if you would like to watch video tutorials of exactly how I set up my lighting for portrait photography, you should really consider my online flash photography class.
Whether you are in the studio or on location, you can achieve different lighting styles to complement your model. It is important to remember that different lighting styles will look better depending on the shape of your model's head. Go ahead and start with your go-to lighting setup and see how that looks on the model. If it is a winner, then keep working with it. If you aren't completely satisfied and believe something could be better, it's probably the light.
4 basic, easy-to-remember lighting setups to get you started:
One Light Portrait
What to Look For
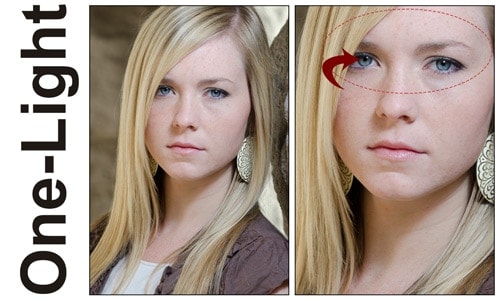
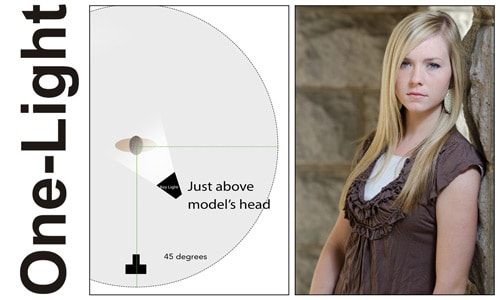
One Light portraits can be difficult to detect, unless you were the one taking the photo. One way to know if there was light involved is to look at the catch lights in the model's eyes. Seeing the catch lights gives you an idea of where the light was placed and if there was more than one light.
Using one light will work best when you have other ambient light in the photo. Your flash becomes the key light. It is easier to expose for the background when you are adding the light to your model.
The Setup
|
Some Tips
|
Butterfly Lighting
What to Look For
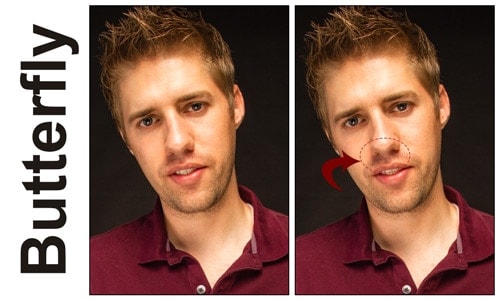
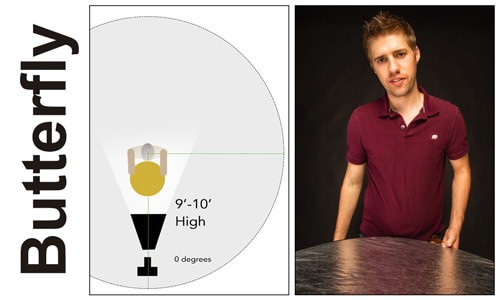
You can easily identify butterfly lighting by the small shadow that appears under the model's nose. To fill in the shadows a little, you will most likely need a reflector or second flash pointed up. This makes it so the shadows aren't so long on the face.
The Setup
|
Some Tips
|
Rembrandt Lighting
What to Look For
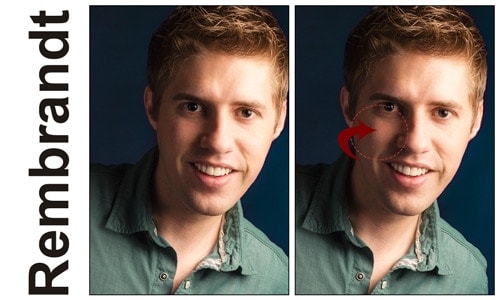
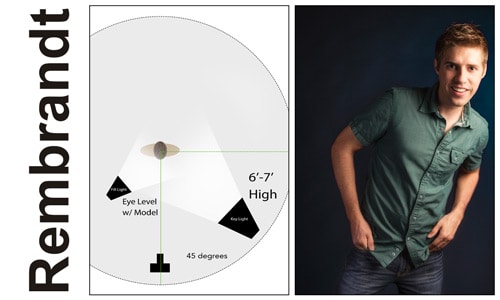
In Rembrandt Lighting, you're looking for a small triangle of light that appears on the opposite cheek from where the flash is placed. This is a very common lighting style and will look flattering on almost anyone you try it on. A good rule of thumb when placing lights is to always place the light on the side where the model parts their hair — particularly with female models. Otherwise, the model's hair will cast a big shadow across their face.
The Setup
|
Some Tips
|
Headshot Lighting
What to Look For
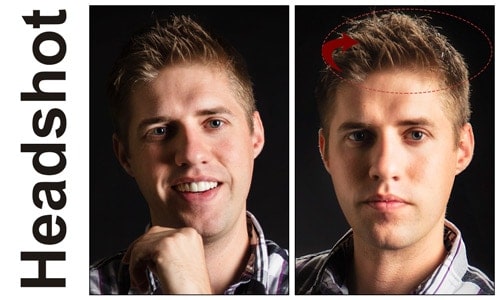
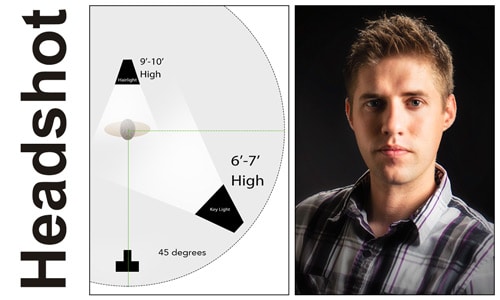
Headshot lighting is important when shooting on darker backgrounds. Sometimes, the color of the model's hair will blend right in with the shadows and the color of the background. Use a hair light to create an outline around their head and pull them off the background. The way you can recognize this lighting style is when there are visible highlights on the person's hair. This can be overdone, so be careful and only apply enough light to create the outline.
The Setup
|
Some Tips
|
Continue to the next article in this flash photography basics series by clicking the red button below.
nc
Hi JIm.
I was going to buy your flash set up that you recommended and I see there is a new item available and wondered if it was better or could replace the receiver for Nikon? I have a Sony Nex 6 and am so lost but would love to learn off camera flash and have no clue what I am doing! Thank you for your flash basics post, it certainly helped”shine Light” on the subject! Any help would be wonderful as I have a small budget.
YN560-TX
http://flashhavoc.com/yongnuo-yn-560-iii-review/
Erin
This is a respond to Erin’s comment……
I own a Sony Nex-6 and a Sony A6000. I bought the Yongnuo flash and transceiver but never got the transceiver to work.
Apparently the Sony standard hot shoe make it difficult to connect. (Not to be confused with the different proprietary hot shoe of Nex-5 and before models that are entirely different to the standard hot-shoe)
However, knowing that the Yongnuo is a dumb flash (it will respond to any light)….I would first lift up the on-camera built-in- flash, then put on the Yongnuo. This way the bulit-in flash will not contribute to the final flash power because it points to the ceiling, but act as a very nice trigger for the Yongnuo. ……If you can get the Yongnuo to work just by being on the hot shoe it is even better.
I bought the YN560-TX and find that it would only work some of the time . On Youtube there are all kinds of suggestions about taking the paint off the hot-shoe, wedging the side of the hotshoe, etc. I find that if you twist the YN560-TX to the right, there is a higher chance of getting this to work.
These Yongnuo flashes are wonderful. Now I have 5 flashes and a radio transmitter , all for the price of one Nikon or Canon flash.
Good luck and happy shooting.
Thanks for the light set-up recommendations.
My personal favourites are the Butterfly and the Rembrandt. 🙂
Kind regards,
Bobby
Really cool way to explain lighting setups. I learned a couple of new things that I’ll love to use. Just before reading this I came across a similar tutorial on lighting I thought is very useful so I’d want to let everyone know. It’s a tutorial from Photographer Nick Saglimbeni. https://photowhoa.com/deals/nick-saglimbeni-lighting/
Hi all,
I have run a number of lighting courses for my camera club, individuals, small groups and schools. Lighting is a very wide subject but this is an excellent starting point. Well done.
I have a page on one of my websites about being prepared for a photo shoot that may be of interest to both photographers and models. The link is
http://www.art-seekers.com/portrait-tips.php
All the best
Mike
Great instructional contents
Great educational contents – thank you
Bravo!!
Great IMPROVE insights
Lighting setup is very important for taking high quality photos. Most of the professional photographers use lighting setup to increase the exposure quality, to boost the picture quality, etc. In your article you described every detail which we will need to know to buy a better lighting setup. Thanks a lot for your suggestions. Do you think taking pictures in lighting setup can bring much of a difference than comparing them with taking pictures in natural light? If I decide to buy any lighting sets then which model would be a better choice for product photography?
great in-depth explanation in this topic
this is the really nice article you always said correct information
Hie I m Nick Smith, working for spirit Airlines
Will you believe if i tell you there is an quick and easy way to book flight tickets?
Just call us at spirit airlines,and get assistance to book best deals and discounts on all flight bookings. for booking call tel:1-844-414-9223
Book flight tickets and get exciting offers
Book flight tickets with Allegiant Airlines and get exciting offers
get exciting offers from spirit airlines
Amald has been casted a ballot as the main and most proficient installment specialist organization for online business sites because of the reconciliation of the most recent innovation in the framework
Get lowest fares on Domestic and International spirit Airlines flight Booking with best discount & offers. Book your southwest Airlines Manage Booking
Get any astrology solutions like birth chart, career solutions, marriage solutions, business advise, etc. from our carefully selected astrologers. Our online astrologers are eager to provide their knowledge and wisdom.